Let’s start the post today with some eCommerce cart abandonment stats from truelist.co, because we like to geek out early.
- 35% of online transactions are dropped because of a required registration prompt.
- 27% of customers leave because the checkout process is too complicated.
- Slow-loading sites increase the abandonment rate by 75%.
- 35% of people will abandon a site if it isn’t secure.
- Checkout flows have 23.48 elements on average. The ideal number of checkout form elements is 12.
What does this have to do with the Facebook Shop setup? You’re about to find out!
Today, we’re talking about Facebook Shop setup when selling products on Facebook (and Instagram).
If you had a Facebook or Instagram shop prior to May 2020, you’ve probably gotten an invitation to upgrade to Shops.
This is Facebook’s newest addition to the eCommerce capabilities of the platform.
If you’ve never sold on Facebook, we’ll show you how to create your Shop from scratch later in the post.
Facebook Shops was launched last year to help small businesses.
As Mark Zuckerberg puts it:
“Facebook Shops gives [small businesses] the same tools to build and operate your online store that global brands have had for reaching their customers.”
The cart abandonment stats we shared earlier are all reasons Facebook Shops is something to at least consider for your business. We’ll talk about that in a bit.
For today’s post, we’re assuming you already have…
- products you want to sell,
- a Facebook and Instagram account, and
- you want to start seeing results from selling on Facebook.
If that’s you and your business, keep reading.
Let’s get started!
Takeaways
- Facebook Shops gives the same tools to build and operate your online store that global brands have had for reaching their customers.
- The process of setting up your Facebook Shop is much more streamlined now.
- Using Facebook Shops is a great way to find new customers and grow your business across multiple platforms.
Facebook Shop Setup: Why Should You Do It?
If you’ve been running shopping ads on Facebook for any length of time, you may be thinking…
“Wait, I already use a Catalog to advertise on FB. Why do I need to learn Facebook Shop setup?
What’s the difference between Shops and a Page or account with linked Catalog products?
Or between Shops and the Shop tab that was on my business page before?”
Well, Facebook Shops are a mobile-first in-app experience that allow users to:
- discover your brand,
- browse your shop,
- share products with others, and
- make a purchase
…all without leaving Facebook or Instagram.
This is great because 79% of Facebook users access the platform from a mobile device.
Customers can message you directly on FB, IG, or WhatsApp to ask questions and get shipping updates.
Facebook says they’re planning to bring shop display and purchasing to WhatsApp, Messenger, and Instagram Direct soon.

As well as the option to link products before you go Live, so folks can shop directly from your live stream.
Benefits Of Setting Up Your Shop (For Both Facebook And Instagram)
Before you dive in and get started with the Facebook Shop setup, here are some more reasons why you should do it.
The release of shops could not have come at a better time for small businesses.
Just as the repercussions of lockdown restrictions and quarantine were hitting businesses hardest…
…Facebook launched Shops, providing millions of small businesses access to a brand new way of selling.
For businesses that hadn’t really developed an online presence, Shops was a game-changer.
It helped businesses everywhere discover the power of selling on social media.
But other than a godsend during a disaster like the one we saw last year, why else should you consider using Shops? We’re so glad we asked that for you.
1. Shops allow you to showcase, promote, and sell your products on various platforms.
When we say various platforms, we’re talking about Facebook, Instagram, WhatsApp, Messenger, and Marketplace.
You’ll need to set up Checkout on Facebook to use all the available placements.
By doing a simple Facebook Shop setup, you’ll have access to the users on each of the platforms we mentioned.
Thus, expanding your potential customer base exponentially.
Who knows who will find you and fall in love with you.
2. Shops are free to set up and use.
This makes them a great option for small businesses or businesses with teeny budgets.
And, it makes Shops a pretty low-risk experiment for you to play with.
You should know that Facebook plans to start collecting seller fees in July 2022. Currently, the seller fee is 5% per shipment over $8.00.

3. Shoppers want to support you.
We think one of the best things to come out of 2020 was the support and love that local communities and shoppers showed to their favorite local businesses.
We learned that people want to support small businesses – but sometimes it’s impossible to do so (like if they can’t physically go into your store anymore).
When you give your customers more options to support you, they’ll use them.
4. You can start with a Facebook Shop setup even if you don’t have a website or online store.
If you choose checkout on Facebook, you don’t even need an external website in order to sell.
If you’re bootstrapping your business and have $0 for a website (and let’s be real, that’s a lot of entrepreneurs and small businesses), this is a big win.
5. Easy checkout process.
Many online shoppers will abandon their shopping carts if the checkout process is too difficult or has too many steps.
If you allow checkout on FB, your customers have a seamless, quick checkout.
Remember those stats from earlier? They’re all issues that are eliminated when you use the checkout option on Facebook.
Steps You Need To Take For Facebook Shop Setup
Setting up a Facebook Shop used to be one of the worst things to do.
There were so many steps involved.
And also, you had to go to a couple of different areas on Facebook to connect or upload your business information and products.
But don’t let our bad memories stress you out.
The process is much more streamlined now. Let’s get into it.
Before You Get started:
In order to do the steps for a Facebook Shop setup, you need to have a Facebook Business Page and a catalog.
Also, your Instagram and Facebook accounts need to be linked to your Facebook Business Manager.
If you’re just starting out, you can set up all of these things at once during your Facebook Shop setup.
Let’s look at the Facebook Shops setup process, and some of our tips or experiences as we go.
We’ve recorded screen shares of us actually doing this on Facebook so you can follow along with us.
If You’re Brand New to Facebook:
You’re lucky, because the Facebook Shop setup process has only gotten more streamlined (and less confusing) over time.
You’ll use the Commerce Manager to manage everything shop-related. Let’s look at that now.
Go to facebook.com/commerce_manager.
And if you’re not logged in, Facebook will prompt you to do so.
But if you are logged in, you’ll be placed right in the Facebook Shop setup flow.
Step 1: Read through Getting Started

Your first step is to read through the Getting Started section.
This is so you’ll understand how the Facebook shop works and get any extra tips from Facebook.
Facebook updates these flows and the information on the pages periodically, so it may look slightly different for you.
Don’t worry if that’s the case. You’re in the right place.
Step 2: Select where you want customers to checkout
You have 3 options here:
a. Checkout on Facebook and Instagram.
This is Facebook’s favorite option and comes, recommended to you in the Facebook Shop setup flow.
In order to use this option, you must be a business address in the U.S. and must have a U.S. bank account.
When you set up checkout on FB and Instagram, you’ll also need this list of documents and information:
- Business category and type
- A business address in the US
- U.S. bank account details for collecting payouts
- State Tax Registration Number for every state where the business operates, for tax purposes
- Federal Tax Identification Number that matches the business representative’s name for financial reporting
- A business representative’s personal or business identity information to verify the authenticity of the business
- Shipping options, return policy, and a customer service email to set up customer service
b. Checkout on your business website
This is a great way to make sure all traffic goes through your website.
Yes, you want the sale, but you want folks to leave your website to get it. That’s okay!
It might not be Facebook’s favorite, but if it works for you, then stick with it.
In order to use the, “checkout on your business website” option, you’ll need to:
- Manage Page permissions for your Page
- Manage Catalog permissions for the catalog in Business Manager. Once a catalog is shared with you, you can select it during your Facebook Shop setup
- Be an admin of the Business Manager account (if you use BM to manage your pages and catalogs)
c. Checkout via Messenger
Quoting directly from Facebook’s Help Center:

“You can direct buyers to message your business on Messenger or WhatsApp to complete their payment.
This option will not set up a checkout method for your shop. Instead, you will need to set up your own way to process payments and fulfill orders. “
Step 3: Choose sales channels

Your sales channels are just the accounts you want to sell from. If you have multiple accounts, you’ll make that selection here.
If there are any advertising credit offers for you, you’ll be able to quickly identify those here.
But if the account you want to use is greyed out, it means you don’t have admin permissions.
You’ll need to request those permissions from the admin of the page before you move on.
And while you’re asking, be sure you have Business Manager, Catalog, and Instagram permissions as well.
Step 4: Connect your business account

Select from the business accounts you manage (you may only have one if you’re a small business).
If you don’t have a business account, don’t worry, you can easily create one during this step in the Facebook Shop setup.
Just enter the name of the business manager (we would go with your business name here) and your business email. Click next.
Step 5: Add your products

You’ll choose the catalog you’d like to connect to, if you already have one, or you’ll create a new catalog here if you don’t have one yet.
You may see some catalogs that are grayed out, which means they don’t meet the requirements to use in your shop.
If you create a catalog now, you’ll add products at a later time, so just name it something that makes sense (we like to follow the business name here).
You have two options: either a Services Catalog or a Product Catalog.
The differences here are minimal.
Choose a services catalog if you sell services like hair cuts, cleaning, consulting, design, etc. No physical goods will be exchanged.
Choose a product catalog if you have a physical item that you will be shipping to buyers.
Step 6: Set your shipping and returns

Your final step before you get to preview your shop is setting up your shipping and returns.
You can change or edit these later, so don’t stress out about it during your Facebook Shop setup.
You’ll choose from these three shipping options:
- Standard
- Expedited
- Rushed
Select how much you’ll charge for shipping, if you’ll set a charge for an additional item, and how many days shipping takes.
Enter your return window. Facebook requires a minimum of 30 days.
You’ll want to consider how long it takes you to process and ship orders, and think about how long it will take for customers to return the order.
A 60 to 90-day return policy is usually a good choice.
Verify your customer service email and click Next.
Step 7: Preview your shop details and submit them for review

Look over your selections, double-check that everything is connected to the right accounts, and that you’ve made the selections you want.
You’ll need to verify that your shop meets Facebook’s Seller Agreement.
We recommend opening that up in a new window and reading through that fully before you check and submit your shop for review.
Once you’re satisfied, click Finish.
Unless there are issues with your Facebook Shop, or one of the elements connected to it…
…the review process typically only takes between 24 and 48 hours.
When your application is approved, you’ll receive a notification from Facebook and your products will automatically start showing on your Facebook Shop page.
You’ll need to publish your page to make it visible to the public.
So now that you’ve got your Facebook Shop setup and approved, and it was relatively painless (hopefully)…
…let’s look at your next steps to get this page launched and start seeing some conversions.
Understanding The Commerce Manager
Now that you have successfully finished the Facebook Shop setup process, you’ll be spending quite a bit of time in the Commerce Manager.
Let’s walk through that so you know what you’re looking at, and where to find everything you’ll need to manage your shopping on Facebook.
1. Overview Page

When you enter the Commerce Manager on Facebook, you’ll land on the Overview Page.
This gives you a snapshot of what’s going on in your shopping account.
If there are any announcements, you’ll see them here. Any issues with your data sources or catalog will also be here.
You can easily click “Review Issues” to handle it immediately.
You’ll also have growth opportunities outlined. You can click “See Details” to learn more about those if you want.
These are nice-to-dos, not have-to-dos. These issues are things you should handle immediately.
2. Catalog

On the right, we have “Catalog”.
You’ll see how many items are in your Catalog, and if you click to Manage, it will bring you to the Items Tab.
This is where you can manage all the items in your catalog.
3. Data Sources
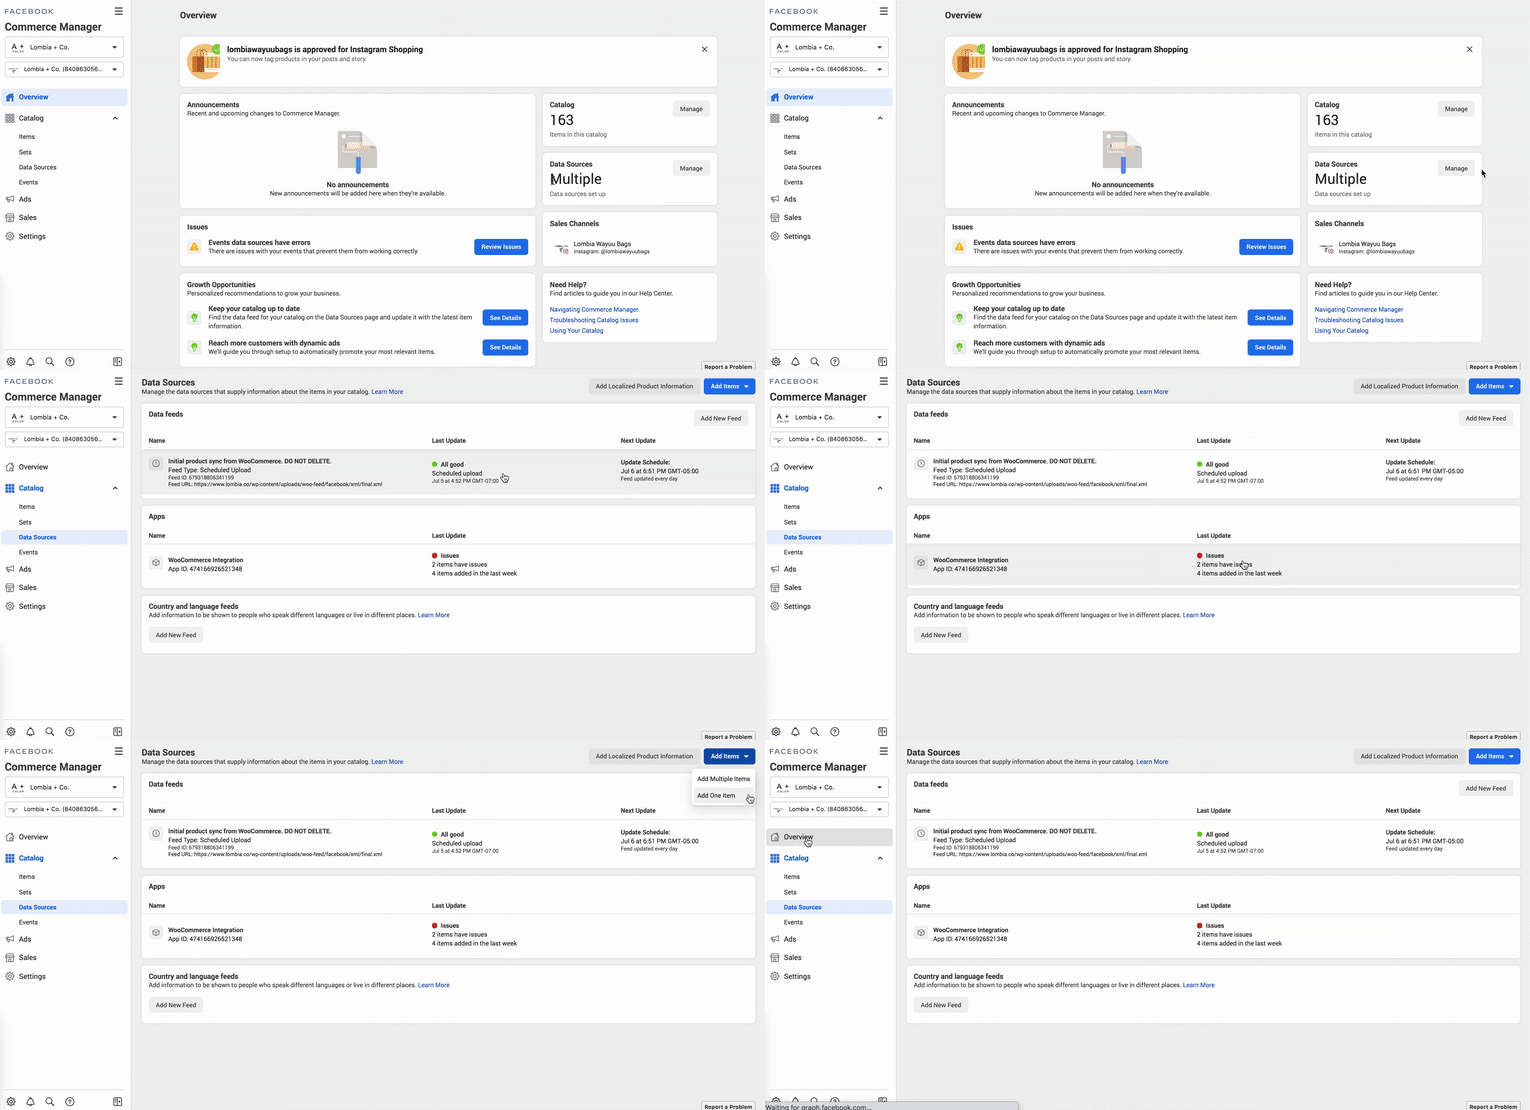
We’ll pop back into Overview and look at Data Sources. This option will show which sources are set up in your account.
Again, you can manage those quickly from here.
You’ll see what data sources you’re using and any issues associated with them. You can also add items.
4. Sales Channels
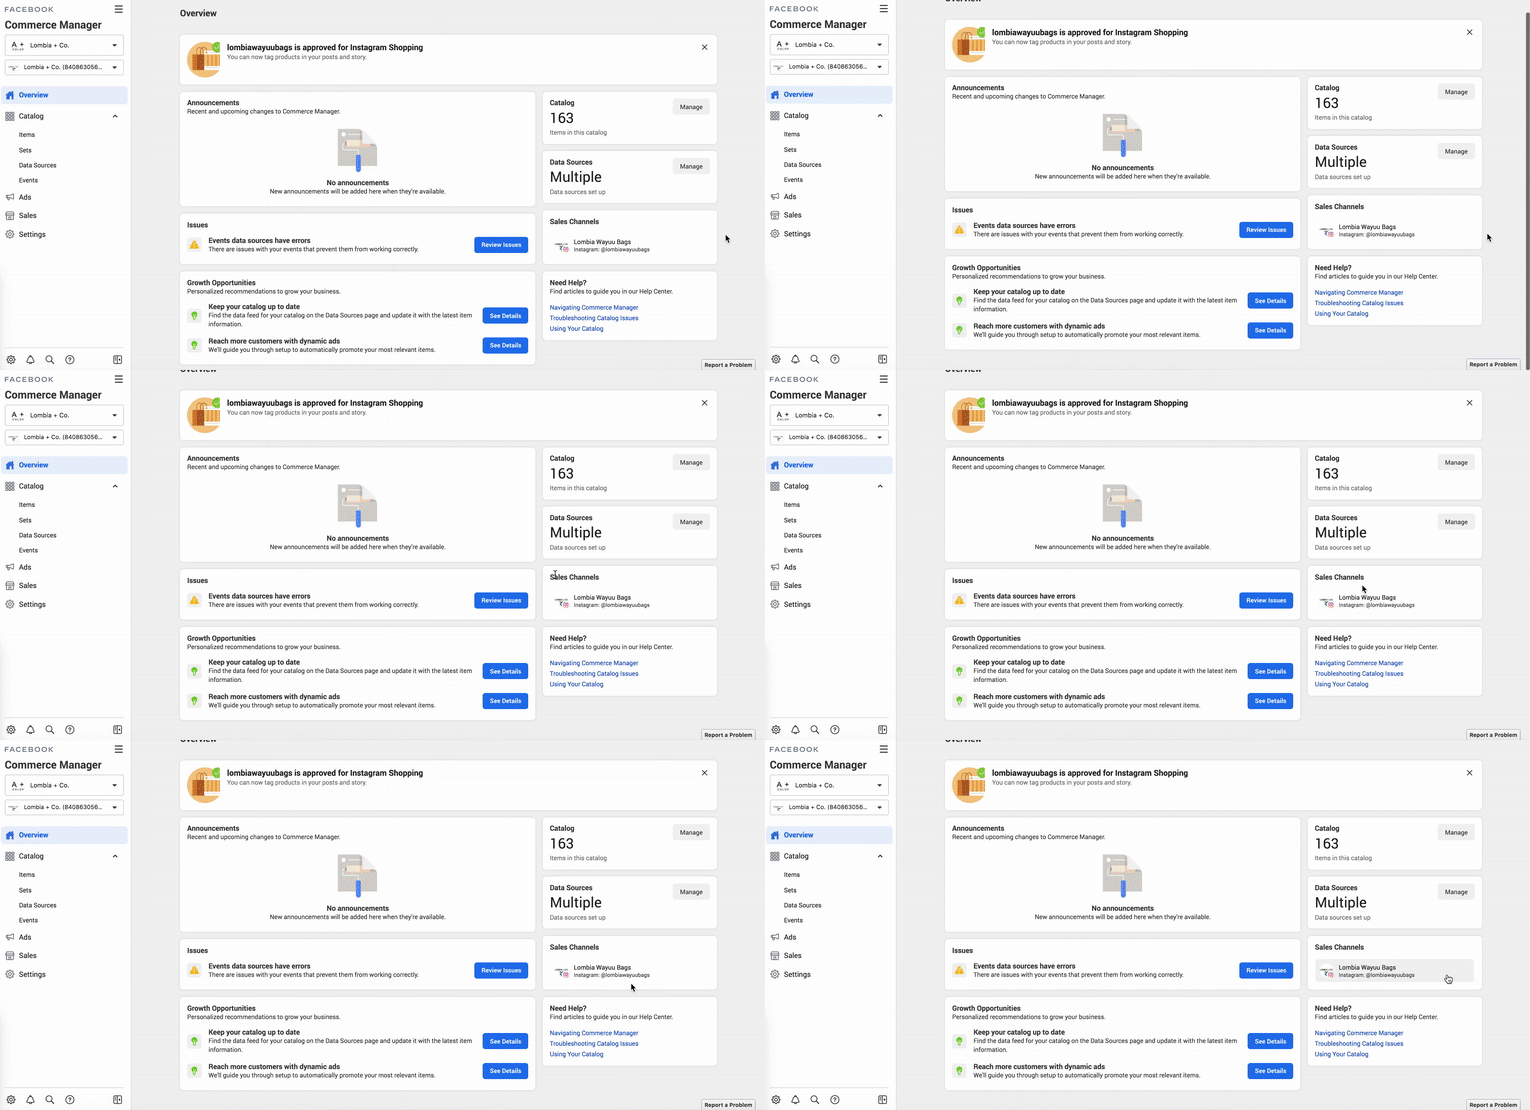
It will display where your shop is displaying, whether that’s on Instagram, Facebook, or both.
5. Helpful Links
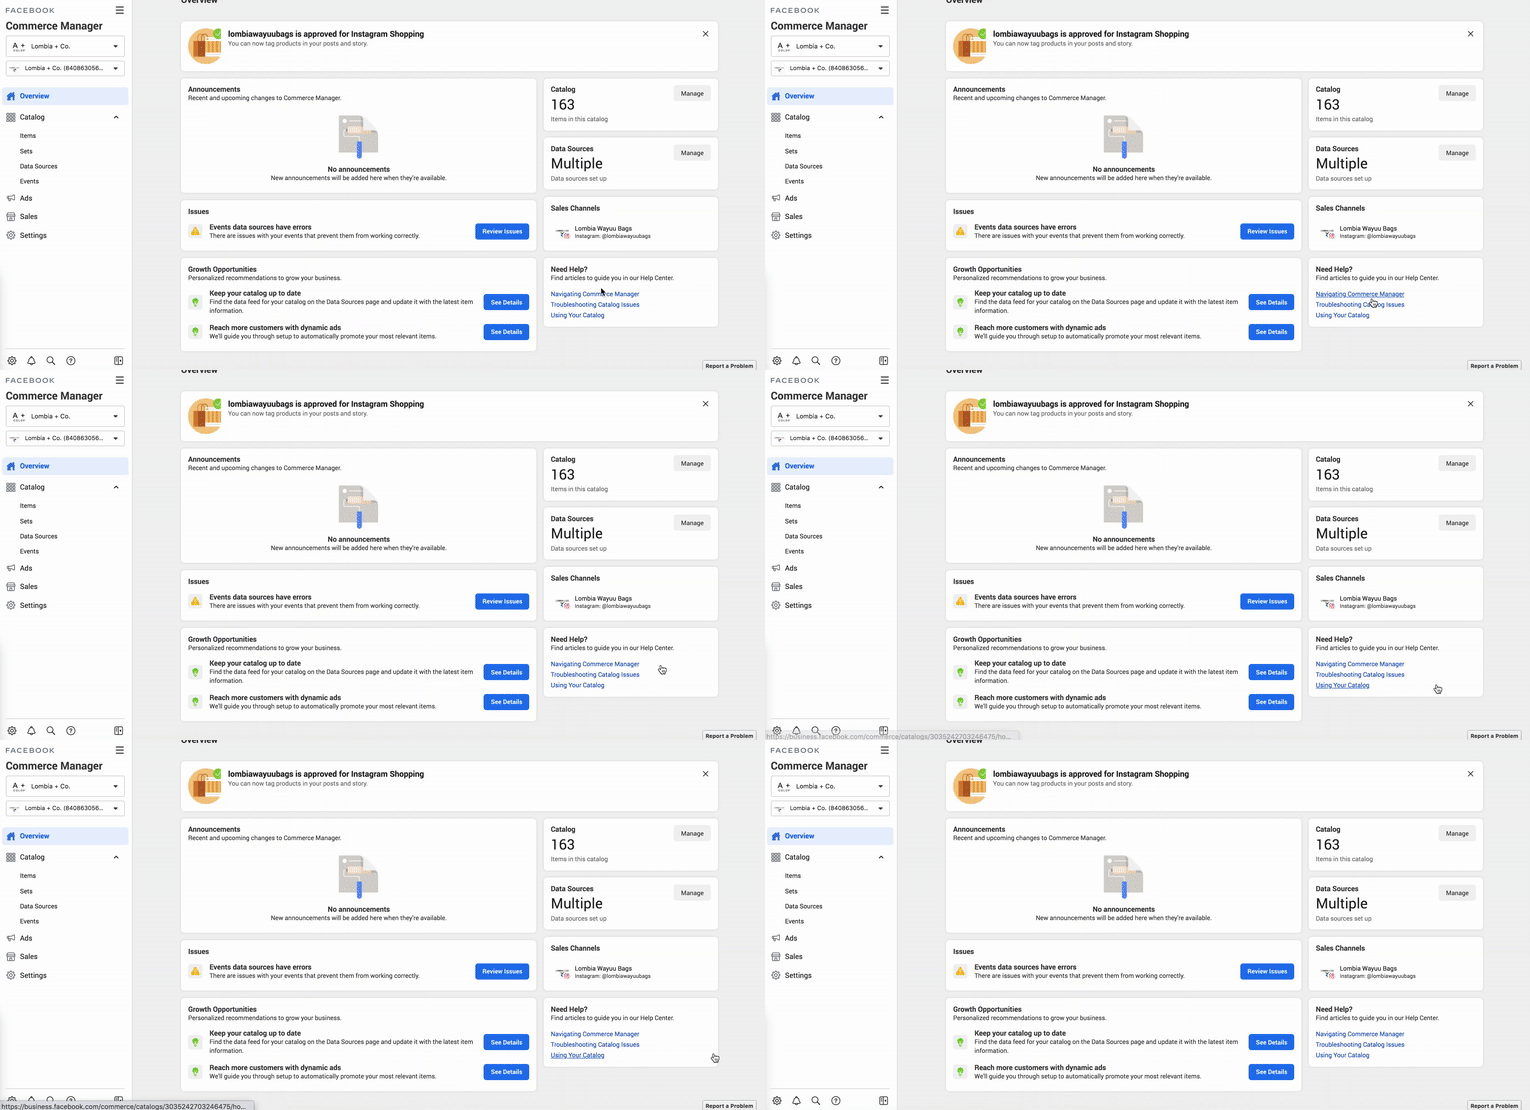
Finally, there are some helpful links from Facebook down here if you need more help.
If you’ve already uploaded a product catalog to use in ads and just need to go over your Facebook Shop setup, you’ll do that in Commerce Manager too.
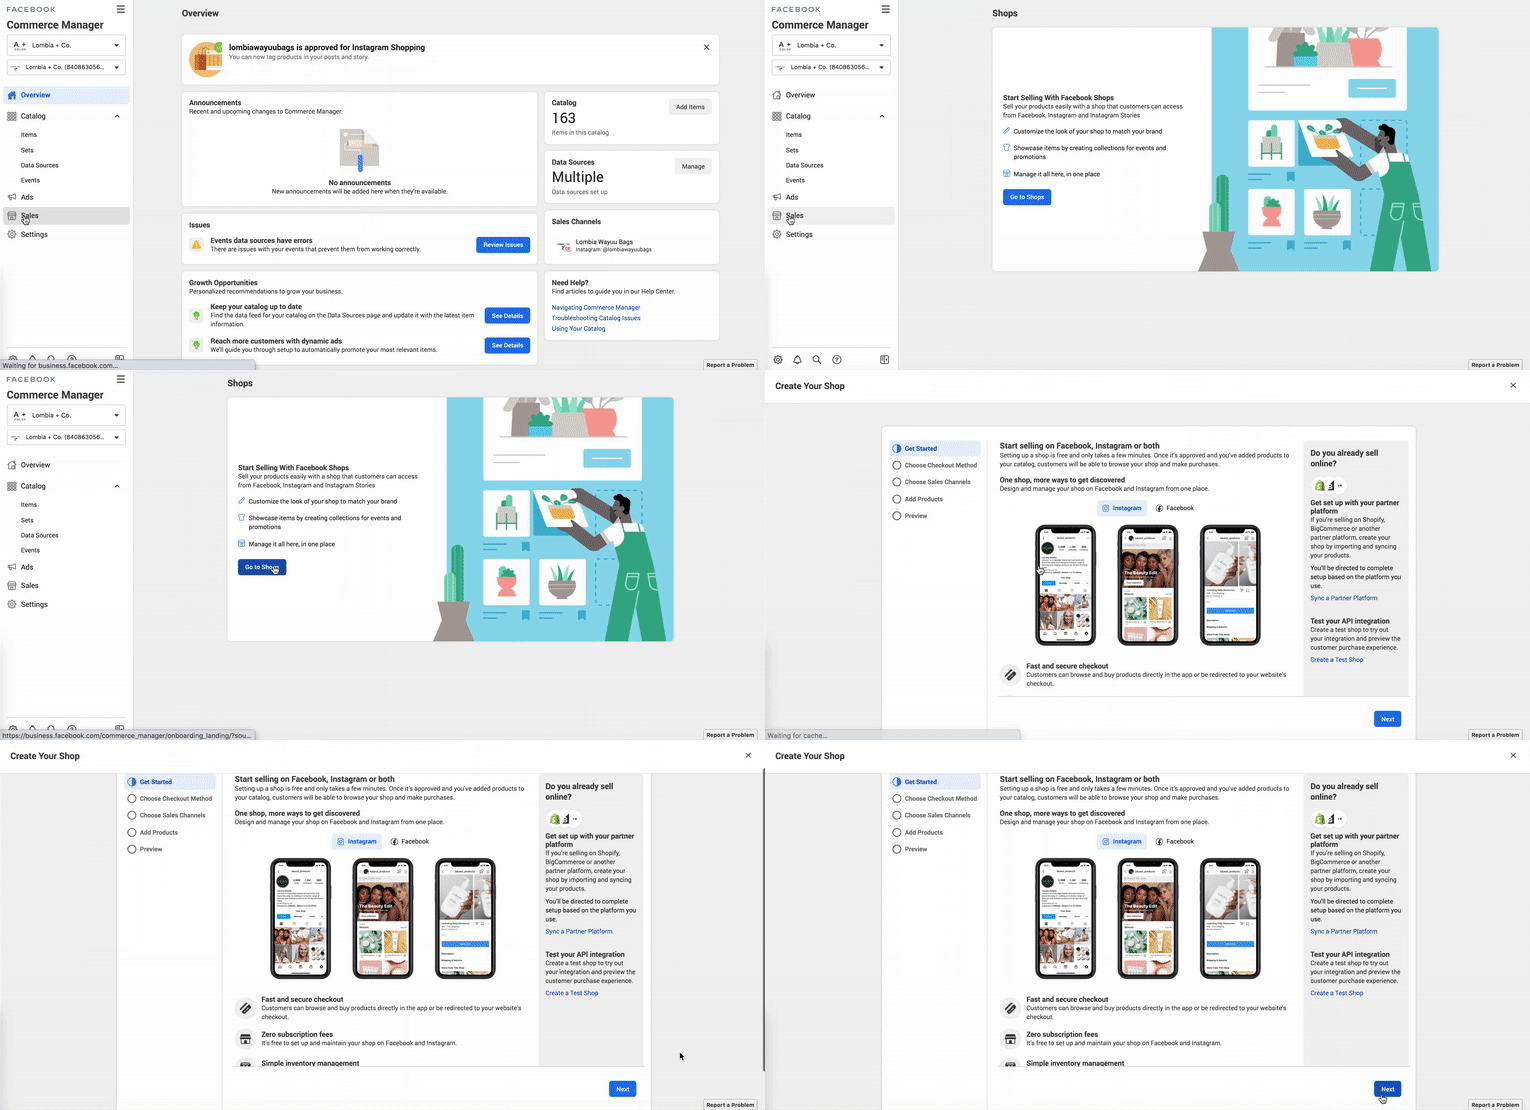
- Go to your Commerce Manager.
- Click Sales.
- You’ll land on this screen if you’re not yet done with your Facebook Shop setup.
- Click Go to Shops and you’ll land on the same Facebook Shop setup process that we walked you through earlier in the post.
Now that you’ve set up your Shop and connected it to the proper accounts, you’re almost ready to start selling.
There are just a few more steps to complete before you can Publish your Shop page. Let’s quickly go over those now.
Complete Your Facebook Shop Setup and Publish it
1. Add products to your catalog
If you set up a catalog during your Facebook Shop setup, you probably haven’t added anything yet.
Before you can publish your shop and start getting those sales, you’ll need to add products to your catalog.
You can add items using 3 different methods:
- through the Commerce Manager,
- connecting to a third party (like WooCommerce or Shopify), or
- using the Catalog Batch API.
Let’s talk briefly about each option before we show you the process.
- Using Commerce Manager
You can upload products manually using a data feed (in the form of a spreadsheet file), or using the Facebook Pixel.
Here’s a handy chart from Facebook to help you decide which option is best for your business.
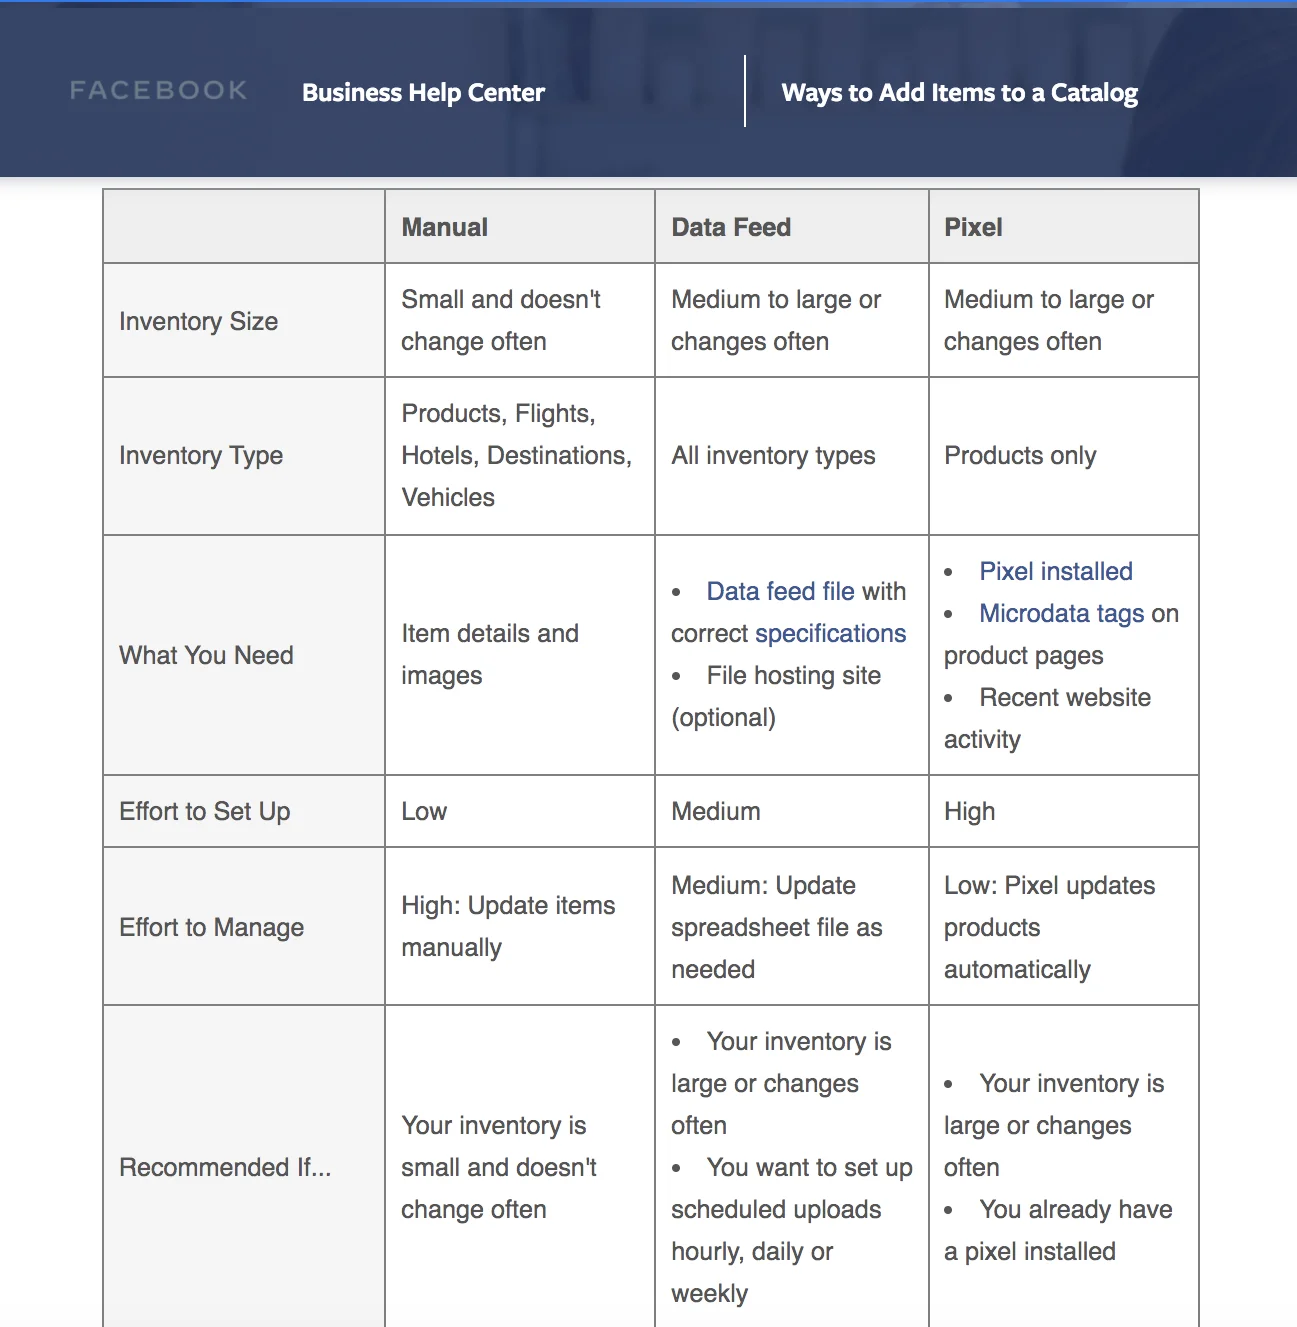
However, it depends on the number of items you sell and how often that inventory changes.
For most of our clients, we prefer the Facebook Pixel option, because that’s seemed to be the easiest to manage.
But you can always switch later if you’re not loving the selection you’ve made.
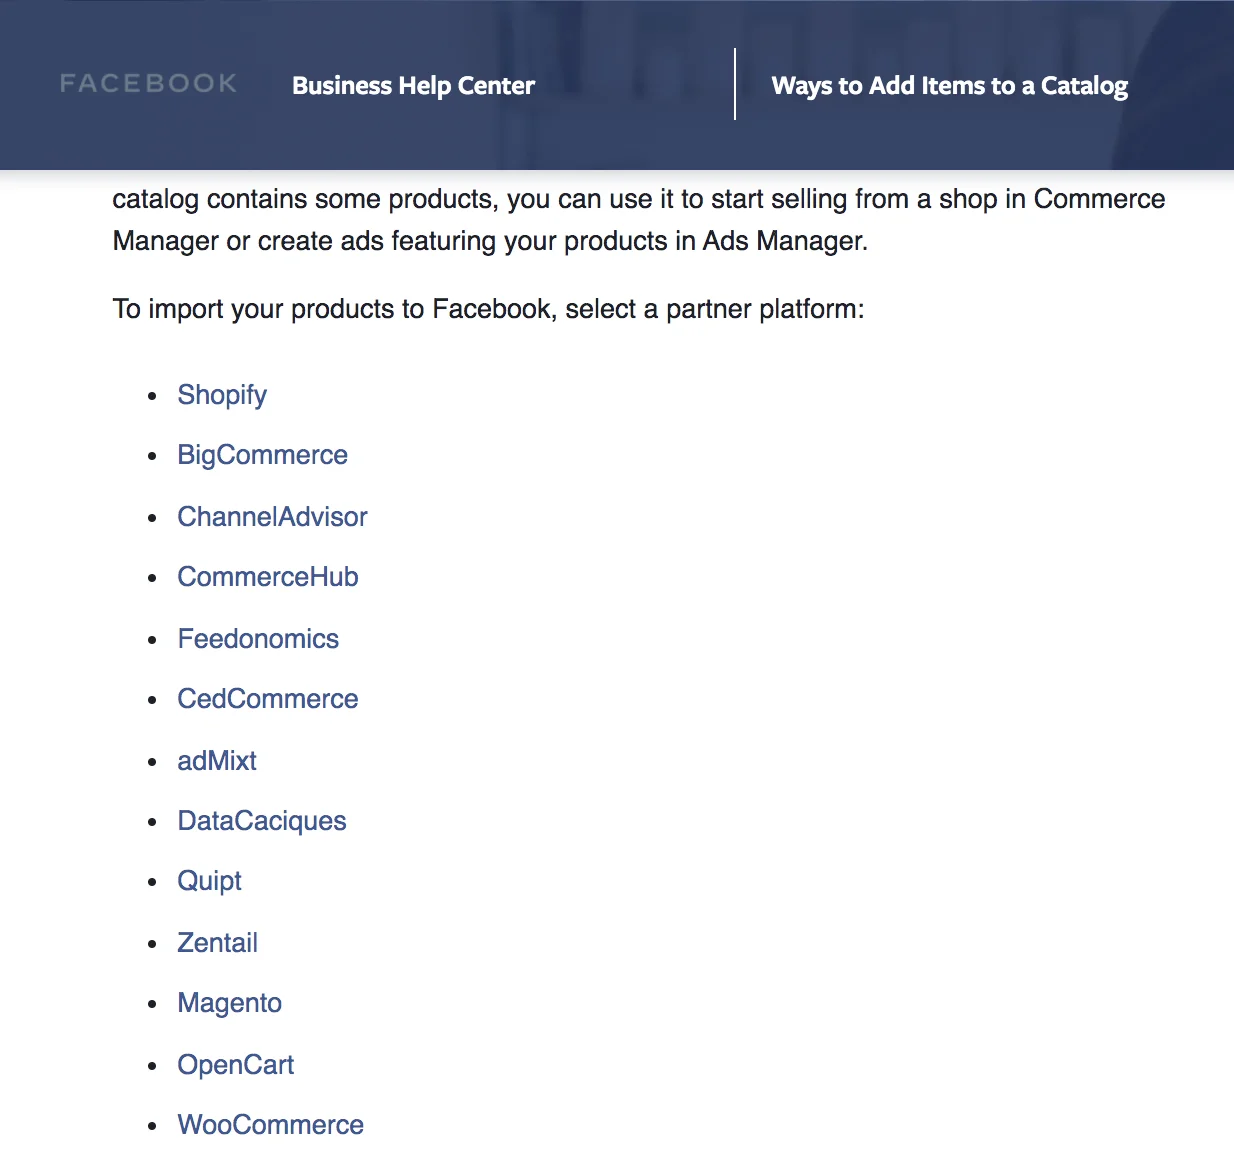
- Using a Partner Platform
You’ll sync Facebook with your platform, so any time you make changes on your website, they’ll automatically be reflected in your shop.
We love this option because it doesn’t take any extra effort or steps on your part.
You can currently select from this list of partners (visit your platform to find specific instructions for linking to your FB shop).
- Using the API Version
Your catalog will be updated using HTTP requests.
This option works best for companies that have a lot of inventory that changes quickly.
This isn’t super complicated to set up.
But, it is helpful if you have a website developer who can help you handle this portion of the Facebook Shop setup process.
Facebook for Developers will have more detailed info for your tech person.

To view products in your catalog:

- Go to your Business Manager.
- From the hamburger menu All Tools, select Commerce Manager (this may be visible in your shortcuts, or you can scroll down and click).
- Commerce Manager is where you’ll manage your shop, including your catalog. To view all the items in your catalog, select Items.
- From here, you can search for specific items, add new items (if you choose manual upload), and create sets.
You can use items from your Catalog in these ad types:
- Dynamic Ads
- Collection Ads
- Carousel Ads
- Ads with Product Tags
- Collaborative Ads
2. Spend time on product descriptions
Just like you would on your website, it’s a good idea to spend time on your product descriptions to make them enticing and persuasive.
If you’ve already got great product descriptions on your website (or elsewhere), it’s okay to carry those over to Facebook.
Just have someone proofread them to make sure there’s no language specific to your website process.
For instance, phrases like “add the item to your cart and select the orange button.”
You’ll want to change any UI or checkout flow instructions to match the functionality of your FB Shop.
- Focuses on the benefits of the product or service
- Tells a story; sets the scene or mood
- Uses language and tone that fits your brand
- Uses selling words and CTAs
- Includes excellent product images (and multiple looks when possible)
3. Customize the look and feel of your shop
After you’re done with the Facebook Shop setup process and your shop has been approved…
…you can go to the Commerce Manager and customize the look and feel of your shop, and update collections.
On your Overview Page, you’ll see a Shops widget tracking your progress through these 3 steps:
- add items,
- customize shop, and
- publish shop
…with green checkmarks indicating what you’ve completed.

If this is your first time using Shops, you’ll see a tutorial prompt like this when you choose Customize Shop.
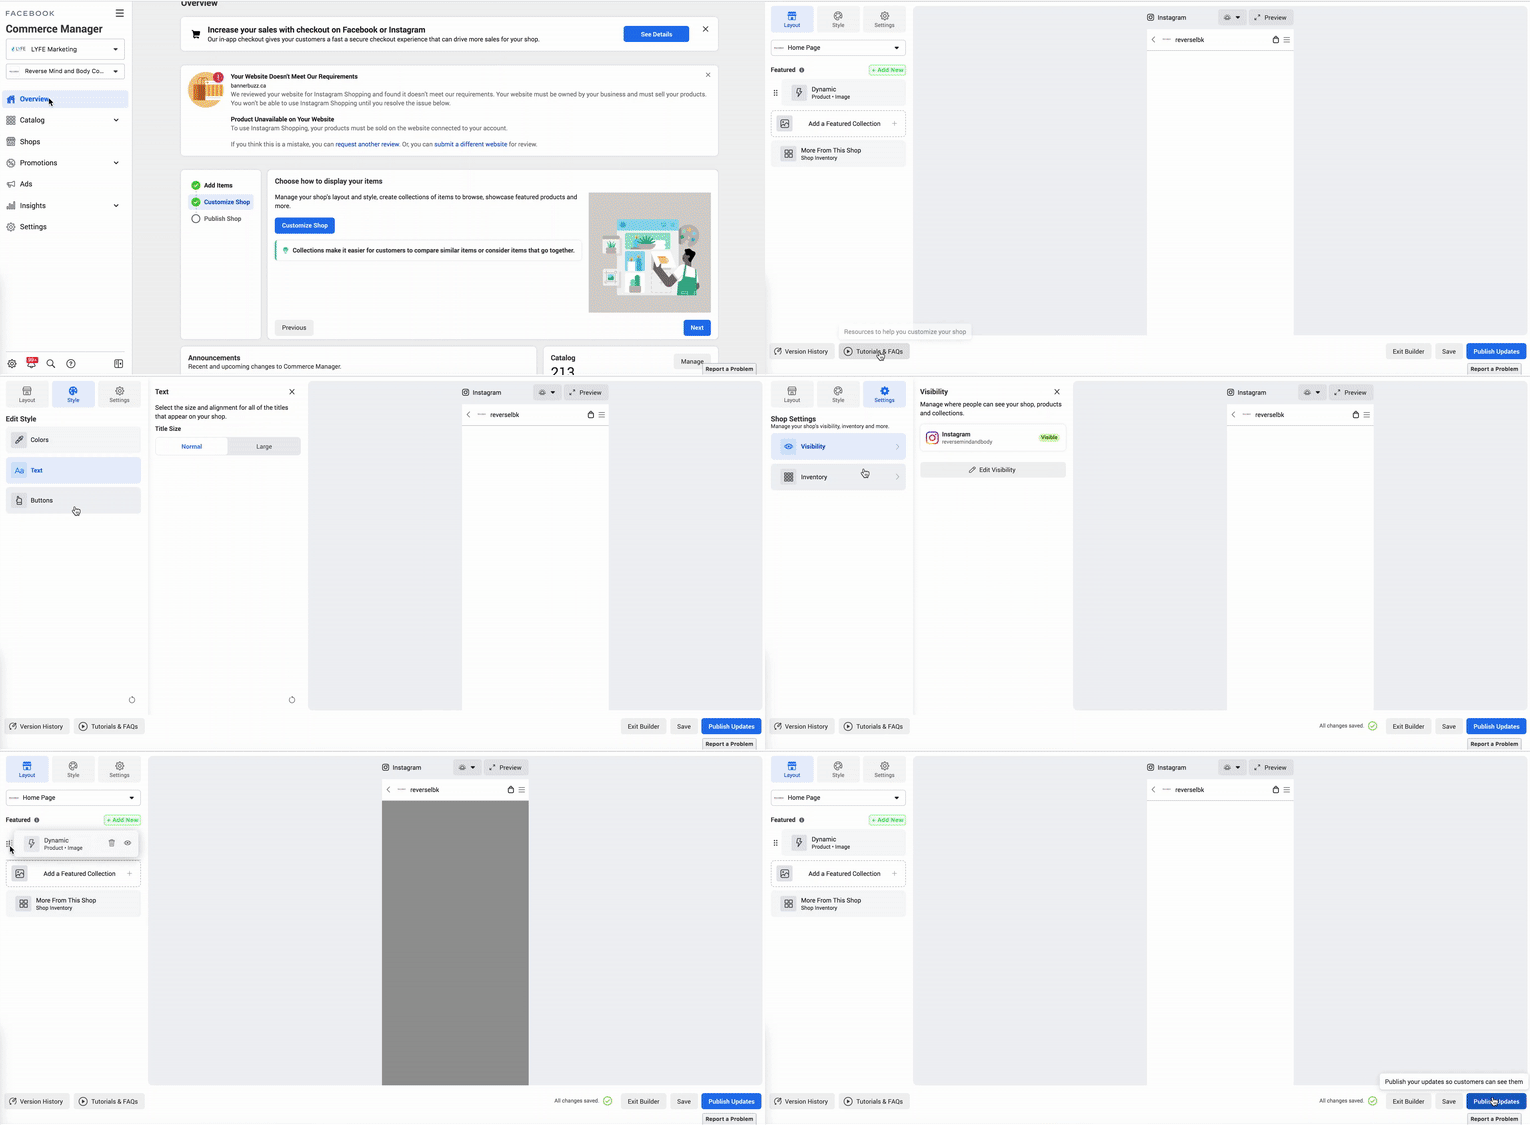
Click through that and you’ll be in the editor.
You can change the layout of your Shops page by reordering featured collections.
Click Style to change button colors and text link colors, size of text, and button styles.
Customization options are limited, but use everything you can to make it match your brand’s look and feel.
In Settings, select where your shop appears and how it updates your products.
Exit the Builder, Save changes, and Publish updates in the bottom right corner.
4. Create collections of products (and feature them in your shop)
Collections are groups of products that you can feature in your shop to draw attention to specific products, categories, or themes.
These collections can be used to enhance the shopping experience for your customers.
You’ll add collections in the Shop tab in your Commerce Manager.

Click Add a Featured Collection from the Layout tab and make your selections. You can reorder your collections to refresh your page.
5. Publish your shop
When you’re done with all of these Facebook Shop setup processes, and you’re satisfied with your shop look and the collections you’re featuring…
…just publish your shop so it’s visible on all the channels you’ve chosen.
Your Shop and Collections will need to go through an approval process, but that typically only takes a day or so.
At any time, you can unpublish changes, hide your shop, or add other channels.

Check the Settings section in the Shop customization window to change Visibility or in Settings > Business Assets.
6. Advertise your shop with FB and Instagram Ads
When your Shop is published and you’ve made sure you’ve customized it, you need to tell people about it. You can:
- post signs in your physical store,
- announce it on all of your social media channels, or
- send out an announcement in your newsletters
…simply put, do anything you can to get the word out.
Consider running paid ads to promote your shop and collections. You don’t need a huge social media budget to get started.
You could put $600 a month toward your ads and start to see conversions in no time if you have a good strategy.
If you need help setting those up, consider working with a Facebook advertising agency like LYFE. Give our Business Development team a call.
Conclusion
And that’s how you go through about Facebook Shop setup. We hope you find this guide helpful so you can start selling on Facebook.
Using Facebook Shops is a great way to find new customers and grow your business across multiple platforms.
It’s an affordable way to start earning money for your business, and it is simple to set up.
If you sell anything online, and Facebook or Instagram are part of your marketing plan, we highly recommend setting up and using Shops.
Again, if you need help with those, we’re just a call away. Contact us today!


