There are many reasons for wanting to change a specific item’s color in an image.
And the main reasons could be:
- You may need to keep your social media page’s branding and have your brand colors featured in your images.
- You want to omit a color that doesn’t fit your theme for business social feed.
- You might be selling multiple colors of a product and don’t have photos of all the color variations you have available.
When it comes to heavy-duty editing and photo manipulation- there is, hands down, no better application than Photoshop CC.

And that’s what we’ll be using in today’s guide.
In today’s post, we will be showing you how you can isolate, as well as how to change the color of an object in Photoshop.
So to give you a better understanding of how to change the color of an object in Photoshop…
…we will first show you how to isolate a specific object from an image.
Let’s get started!
How To Change The Color Of A Whole Image
So we have this image as our sample opened here in Photoshop.
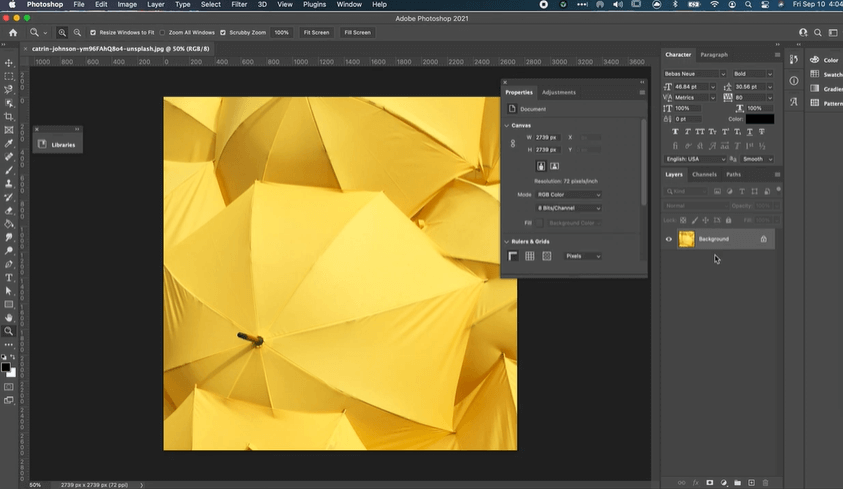
Step 1: Let’s now go to the first step on how to change the color of an object in Photoshop.
Since we’ll be making alterations to this image, before anything else, let’s make sure the layer it’s at is unlocked.
We can do this by double-clicking on your image layer.
When the lock icon is no longer at the right side of your layer, it means it’s unlocked.
If you happen to be doing this on an existing Photoshop file and you imported your image after you set up your canvas…
…your image will not be locked by default and you can skip this step.
Step 2: So to change colors, we need to create adjustment layers.
These layers will let you control what shade, how vibrant, or how saturated you want it to be.
As well as what color hue it should lean into depending on the adjustment layer you create.
There are many adjustment layers you can experiment with to get the right color you’re aiming for…
…and all of them are important to use for different types of images and colors.
For this image, let’s say we want to change it to a shade of purple, so let’s set up adjustment layers for that.
At the top left options on your Photoshop window, click on “Layer and new adjustment layer”…
…or click on the shortcut icon for that which is at the bottom in our layers window and select solid color, then select the color you want.
Click ok and now we’ve created a color adjustment layer over our image.
Step 3: It’s currently a flat solid color layer and we can’t see anything under it. So now we want to set our color to blend over the image below it.
Let’s click on the button that says Normal and select the color to blend mode hue.
And now it’s blended our solid color to the layer below it.
Side note, we encourage you to play around with the different blend modes here…
…so you can see which blend mode works best for your image and the color you want to achieve.
For example, if we select color, we’ll then get this blend mode that’ll keep everything in the image in a shade of purple…
…as opposed to a hue that’ll let us keep our greys and blacks.
Select lighten and it’ll blend like this.
Now we think we want to lower the brightness, so we’re going to create an adjustment layer for that as well.
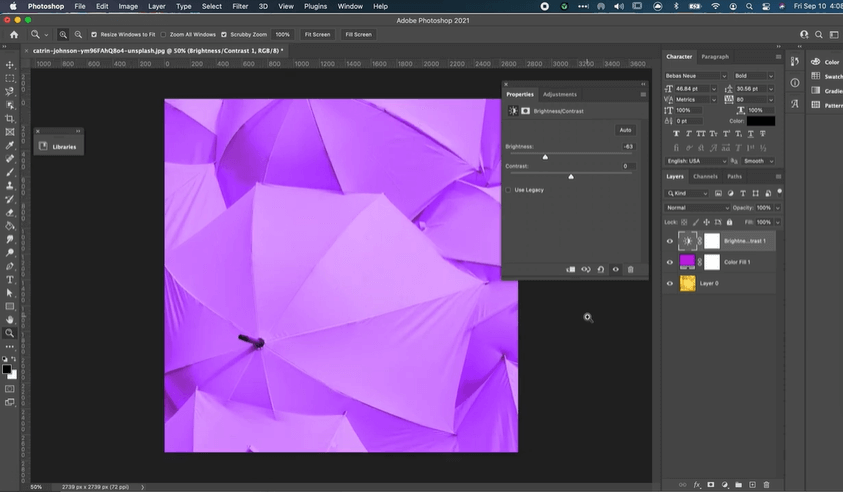
And for this image, we think we’re good.
Step 4: Now what’s great about adjustment layers is that you can always adjust your settings if you want to change anything.
For example, let’s change the image color to blue.
Go back to your solid color layer, double click on the color box and you can now select a different color.
The same goes for any other adjustment layer.
So when you select the brightness and contrast layer, you’ll see the controls on your screen allowing you to edit brightness and contrast.
Now that we have a better understanding of how color blending works, let’s proceed with showing you how to change the color of an object in Photoshop.
How To Change The Color Of An Object In Photoshop
Step 1: Open your image in Photoshop then same as with our previous image sample.
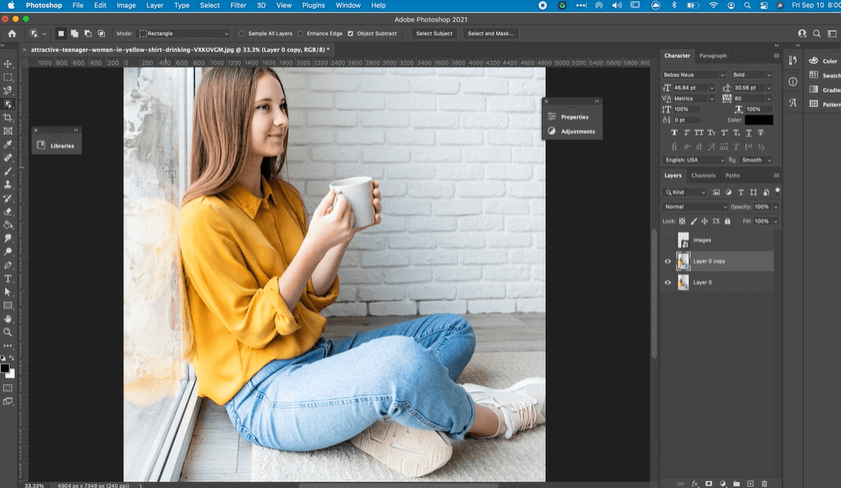
Make sure you unlock your image layer by double-clicking it.
You can also just keyboard press cmd+j or ctr+ j if you’re using a PC.
When you do this, it will duplicate your image.
And we want to do that because we want to keep the original layer to serve as the unedited background…
…to the cropped image we’ll be making from our duplicate layer.
Step 2: Let’s say we want to change the color of this shirt to this color sample here.
If you’re doing this to have your object follow a specific color from your branding or a different object’s color…
…we strongly recommend loading an image with your reference color into your canvas.
This is so when you’re adjusting your object, you can get more accurate color output.
Let’s set the layer to hide for now while we do some prep work for cropping our object by clicking on this eye icon here.
Step 3: Now we’re ready to isolate the object we need to change the color of.
To do that, select the object selection tool on Photoshop’s toolbar.
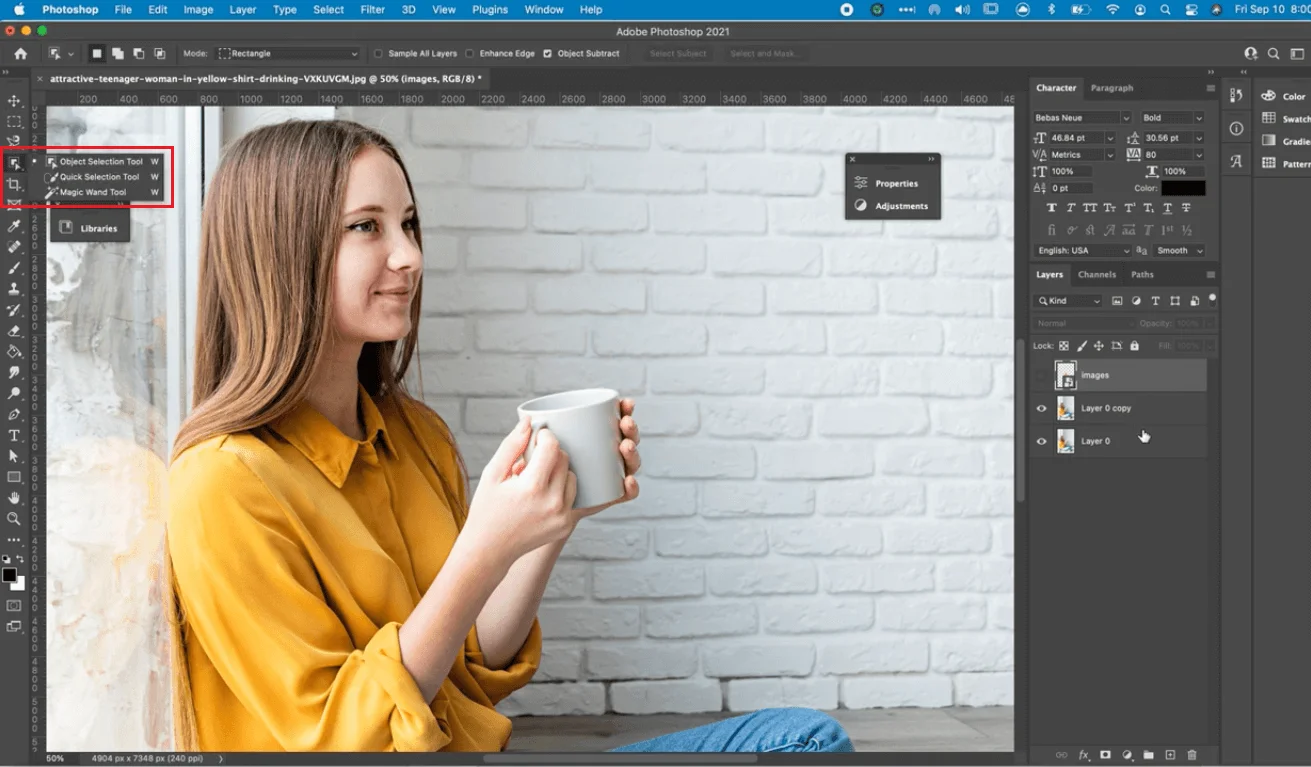
If you can’t see this icon, your toolbar might have one of the other selection tools selected, which is the quick selection tool or the magic wand tool.
If either of these is currently at your toolbar…
…just click on the icon and do not let go until these options show up, and then click on the object selection tool.
Step 4: Now with the selection tool on, click and drag your mouse around the object you want to select.
And then, Photoshop’s artificial intelligence will detect and select it.
Now, this is a pretty good start, but you’ll notice some things outside of the shirt have been included in the selection.
And this is the part where we need to assist Photoshop’s AI in selecting our object.
For example, we want to deselect the part of the model’s arm which the AI selected.
To do that press and hold option (or ALT on a PC), then click and drag over it to deselect.
We’re going to do the same for the rest of the parts of the images we want to deselect.
Now for the parts that the AI missed to select, we’re going to press and hold CTRL, then click and drag over the areas we want to add to our selection.
Once we’re happy with the selection we can go ahead and isolate our object.
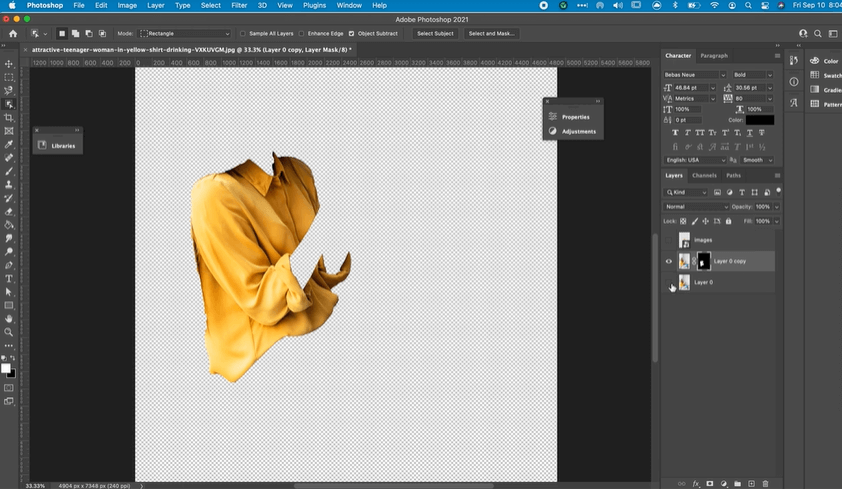
Step 5: On the bottom part of the layers window, click on the add layer mask button.
At this point, if you hide the layer below our mask, you can see that what’s left of the image is our selection and everything else is no longer visible.
Step 6: Now that our object is cropped, we can proceed with editing the color as we did on our first sample image.
On your keyboard, hit cmd+g or CTRL+g if you’re using a PC.
This will make a group to contain the layer of our isolated object layer and adjustment layers.
By keeping them in the same group, we’re containing all the color edits we make within it without affecting the original image…
…which is outside and in the layer below the color change group.
Step 7: Also, be sure that your reference image is above and outside of your group.
You can also set your reference layer back to visible on the canvas.
Now to go back to selecting the cropped image layer, on your keyboard, hold down the command or CTRL on a PC and click on this black area.
You’ll notice that this has a little white area in it where the object’s figure is matched and you should have your main object once again selected.
Step 8: Now we can go ahead and create our adjustment layer starting with a solid color.
For this sample, let’s say we want to change it into LYFE’s blue.
We’re going to eyedrop our reference image’s blue and press enter on our keyboard or click OK on the screen.

Step 9: Now we’re going to color blend mode and select hue.
As you can see the shirt is still too bright and doesn’t match our reference so we’re going to create a brightness adjustment layer.
For every adjustment layer you create, make sure you have your object selected.
So once again, we’re going to hold down the command key on our keyboard and click on the black area.
Once our objects’ figure is selected, click on the create a new adjustment layer button and select Brightness/Contrast.
You should see a window with controls of both brightness and contrast that you can then adjust…
…to get the right brightness to match the color you need your object to be.
And done! We now have a color match of our reference color and our shirt here.
Step 10: Now we thought we’d mention that although Photoshop’s selection tool is impressive and will work most of the time…
…you will have instances of images like this that simply can’t be seamlessly selected by Photoshop’s artificial intelligence.
Or, you might be using an older version of Photoshop namely cs5 and below.
For instances like this, you will have to crop the image manually which we suggest doing via the pen shape tool.
After you make a duplicate of your image, select the pen tool or press P on your keyboard (which is the shortcut for the pen tool)…
…and then make sure the shape is selected.
You can also use the path option, but we suggest using the shape tool for manual cropping as it creates a shape after you trace over your object.
And if ever you need to edit the shape later and revise your object’s outline…
…you can still edit the shape by editing the nodes as opposed to using a path which won’t leave a layer you can edit later on.
And if that’s the case, you’re going to have to trace the whole outline again.
Step 11: Start by clicking on any edge of your primary subject.
By doing this, you create what’s called a node.
Outline your subject by completing a closed shape using your nodes.
You can either trace your subject with straight lines, or if you need to create a curve just click your mouse and hold when creating your next node.
And then, bend the line you just created by dragging your mouse until it takes the shape of the curve in the image.
Once you’ve completely traced over the outline of your subject…
…right-click on the shape you’ve just created on your canvas and select ‘CLICK SELECTION” and “OK”.
You now have a selection that outlines your object.
Click on the create a mask button and you now have a mask layer of your object’s outline.
Then you can proceed with the following steps we did on our previous image sample and done!
If you want to see the full video walkthrough of this tutorial, then simply watch the video at the top of this post.
Conclusion
Photoshop can be confusing to start with.
But the more you use it, the easier it gets to navigate through different functions that will help you create next-level, unique photo edits for your business.
Those are the steps on how to change the color of an object in Photoshop!
If you want to check out more of our design tutorials, then check out the following posts:
- How to remove image background
- How to make a thumbnail
- How to make your business logo with Canva
- How to create quality business graphics
Now if you really want to take your brand graphics to the next level, we strongly recommend working with our team of expert designers.
Check out our graphic design services here or get in touch with us today!


